What you’ll need:
- A micro:bit, battery pack and micro USB cable, plus a suitable computer for programming.
- 1 small servo motor (eg a SG90 3,3v servo)
- 3 crocodile clip leads.
- 3 breadboard jumper wires.
Step One: The Basic Code
You’re going to use the Python editor on the micro:bit website for this jam.
Click here to open the editor.
Copy the basic Python script for this Jam below:
# Artronix Jam - War of the Worlds: Rise of the micro:bits Script 1
# Rotates the servo depending on the microbit's rotation through the x axis.
# Tested with SG90 servo @ 3.3v
# Copy and paste this into the compiler at http://python.microbit.org/editor.html

from microbit import *

class Servo:

    """
    A simple class for controlling hobby servos.
    Args:
        pin (pin0 .. pin3): The pin where servo is connected.
        freq (int): The frequency of the signal, in hertz.
        min_us (int): The minimum signal length supported by the servo.
        max_us (int): The maximum signal length supported by the servo.
        angle (int): The angle between minimum and maximum positions.
    Usage:
        SG90 @ 3.3v servo connected to pin0
        = Servo(pin0).write_angle(90)
    """

    def __init__(self, pin, freq=50, min_us=600, max_us=2400, angle=180):
        self.min_us = min_us
        self.max_us = max_us
        self.us = 0
        self.freq = freq
        self.angle = angle
        self.analog_period = 0
        self.pin = pin
        analog_period = round((1/self.freq) * 1000)  # hertz to miliseconds
        self.pin.set_analog_period(analog_period)

    def write_us(self, us):
        us = min(self.max_us, max(self.min_us, us))
        duty = round(us * 1024 * self.freq // 1000000)
        self.pin.write_analog(duty)
        self.pin.write_digital(0)  # turn the pin off

    def write_angle(self, degrees=None):
        degrees = degrees % 360
        total_range = self.max_us - self.min_us
        us = self.min_us + total_range * degrees // self.angle
        self.write_us(us)


while True:

    # rescale accelerometer x axis to between 0 and 180
    # rescaled_angle = rescale((-1024, 1024), (0, 180), accelerometer.get_x())
    rescaled_angle = ((accelerometer.get_x() /12)+90)
    Servo(pin0).write_angle(rescaled_angle) # write rescaled angle
    sleep(200)
When you’re done, download the .hex file and flash it to your micro:bit. Remember to give the script a memorable name!
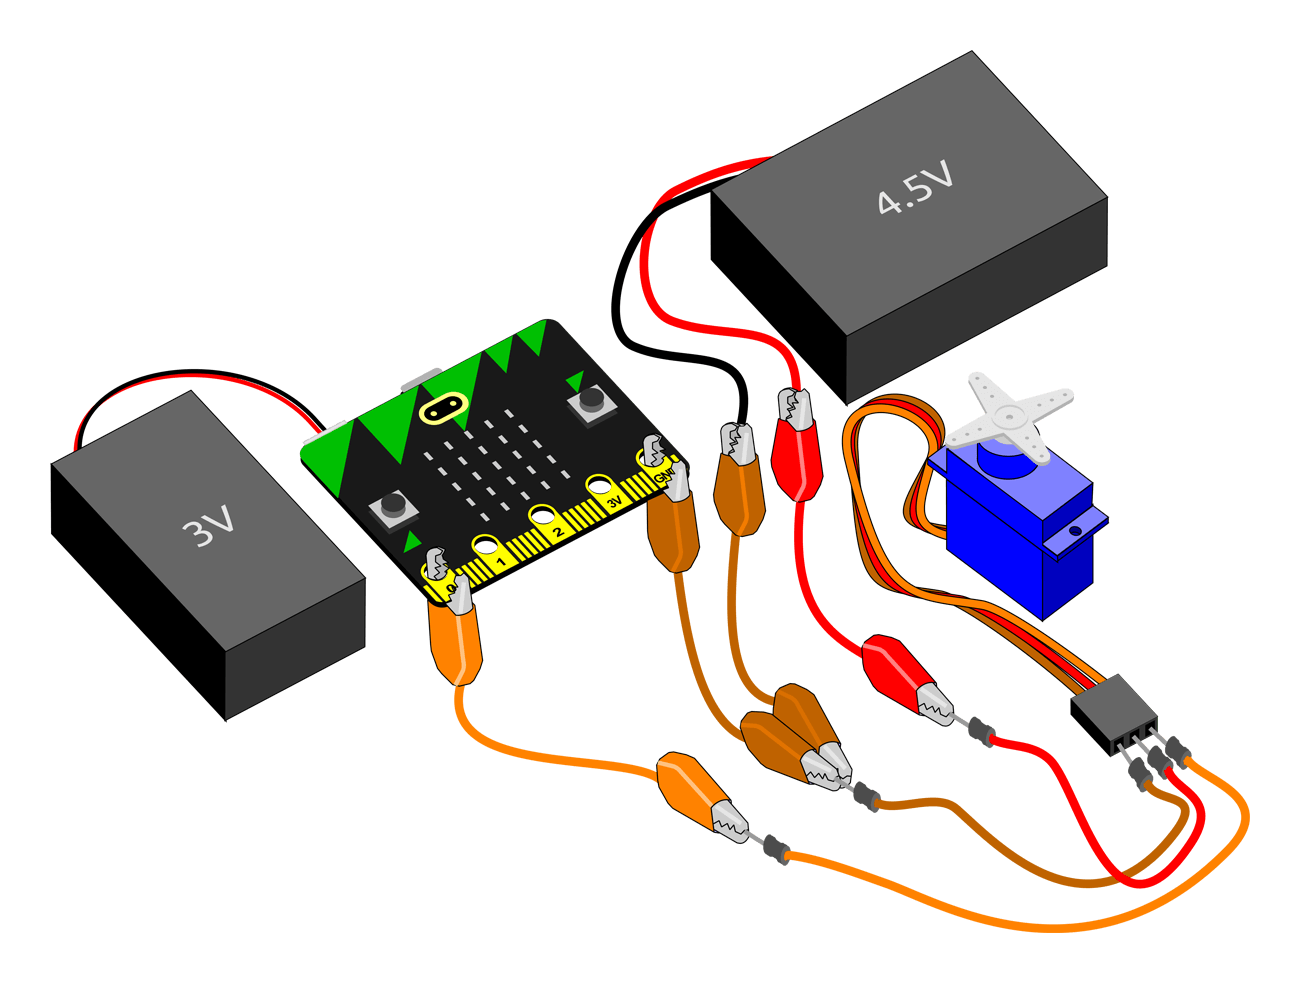
Step Two: Understanding Servos
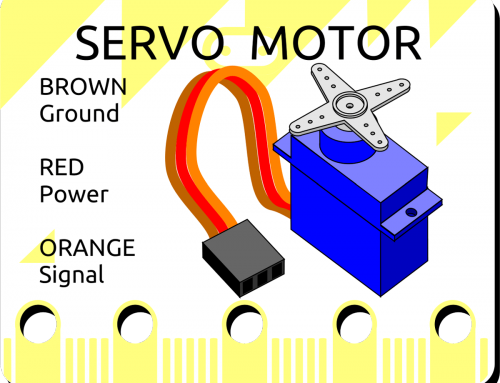
Lets take a look at the servo motor wires.

The colour coding is a hint on how to wire it up correctly. The servo won’t work if wired up wrong, so take note:
- The Brown (or black) wire will connect to GND pin on your micro:bit.
- The Red wire connects to 3V pin.
- The Orange (or white) wire connects to Pin 0. This wire carries a pulse width modulated signal from the micro:bit to the servo motor, telling the motor where to turn to.
Step Three: Wiring Up the Project
Okay, lets wire this up. First, make sure your micro:bit is powered down.
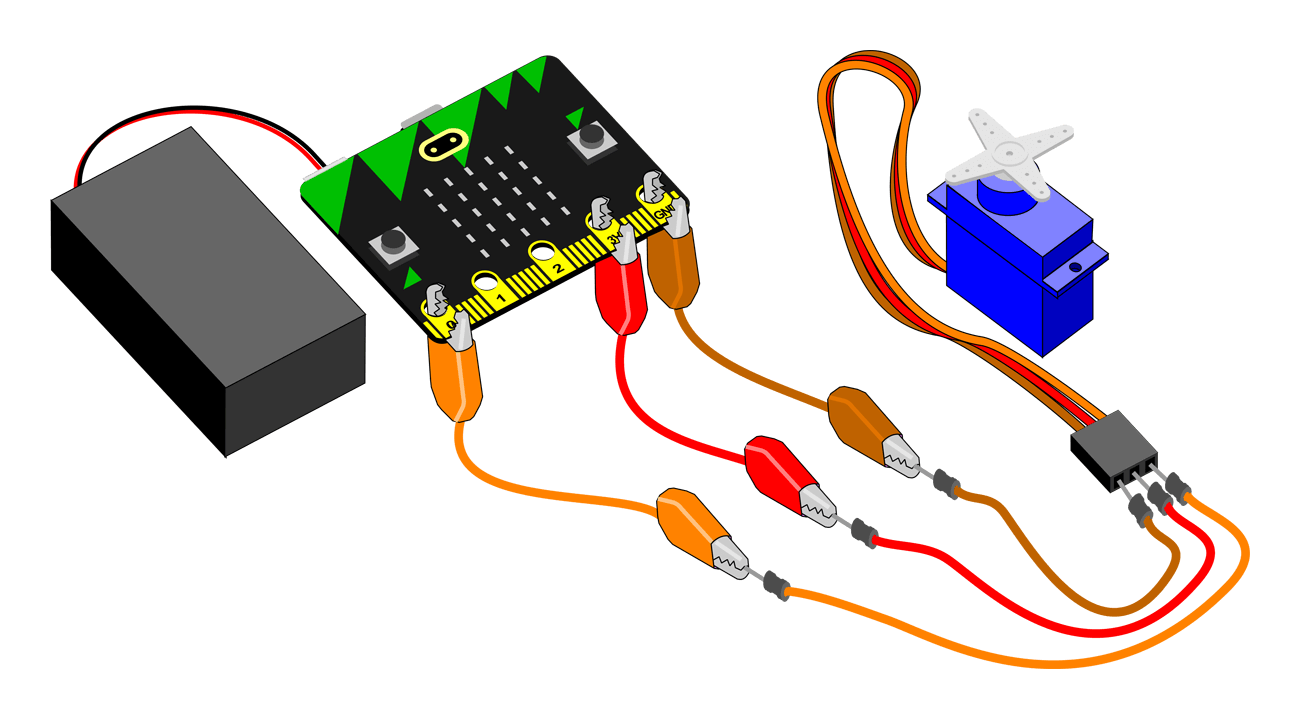
We can use the jumper wires to connect to the servo motor plug then use the crocodile clips to the other side of these wires to the appropriate pin on the micro:bit, as follows.
- Connect the Brown wire to the GND pin.
- Connect the Red wire to 3V.
- Connect the Orange wire to Pin 0.
Connect power and with luck the motor will spring to life. Tilt the micro:bit from side to side and the motor should respond.
If you experience any problems (especially if you notice your micro:bit getting warm) disconnect power immediately and check the mini troubleshooter below.
Mini Troubleshoot Guide
If the motor doesn’t work, is unresponsive or moves erratically, here are a couple of things to check.
Be sure that you’re using the Python Editor on the micro:bit website to write your code. There are other, older Python editors out there, but this one is the most up-to-date. Click here to open the editor
Are the batteries really fresh? The micro:bit is a low-power device but the servo motor is a battery vampire.
If the micro:bit is getting warm, check your wiring. Maybe your servo motor is too large and drawing too much current. You could try attaching an independent battery power supply to it. This could even be worthwhile with the small servo as it will give it more endurance.
Finishing Up
Since our micro:bit is packed with sensors and now has the ability to interact with the physical world, we should now be able to think up all kinds of projects. See if you can modify the code to react to the buttons.